


Dec 04, 2015
Brenden Matthews
D2iQ
9 min read
This is the first of a 2-part series on service discovery and load balancing.
The Mesosphere Datacenter Operating System (DCOS) provides useful tooling for service discovery and load balancing. One of the primary tools is Marathon Load Balancer, which will be the focus of this post.
After you boot a DCOS cluster, all tasks can be discovered by using Mesos-DNS. Discovery through DNS, however, has some limitations that include:
- DNS does not identify service ports, unless you use an SRV query; most apps are not able to use SRV records "out of the box."
- DNS does not have fast failover.
- DNS records have a TTL (time to live) and Mesos-DNS uses polling to create the DNS records; this can result in stale records.
- DNS records do not provide any service health data.
- Some applications and libraries do not correctly handle multiple A records; in some cases the query might be cached and not correctly reloaded as required.
To address these concerns, we provide a tool for Marathon called Marathon Load Balancer, or marathon-lb for short.
Marathon-lb is based on HAProxy, a rapid proxy and load balancer. HAProxy provides proxying and load balancing for TCP and HTTP based applications, with features such as SSL support, HTTP compression, health checking, Lua scripting and more. Marathon-lb subscribes to Marathon's event bus and updates the HAProxy configuration in real time.
You can can configure marathon-lb with various topologies. Here are some examples of how you might use marathon-lb:
- Use marathon-lb as your edge load balancer (LB) and service discovery mechanism. You could run marathon-lb on public-facing nodes to route ingress traffic. You would use the IP addresses of your public-facing nodes in the A-records for your internal or external DNS records (depending on your use-case).
- Use marathon-lb as an internal LB and service discovery mechanism, with a separate HA load balancer for routing public traffic in. For example, you may use an external F5 load balancer on-premise, or an Elastic Load Balancer on Amazon Web Services.
- Use marathon-lb strictly as an internal LB and service discovery mechanism.
- You might also want to use a combination of internal and external LBs, with different services exposed on different LBs.
In this blog post, we're going to discuss the fourth option above, to highlight the features of marathon-lb.
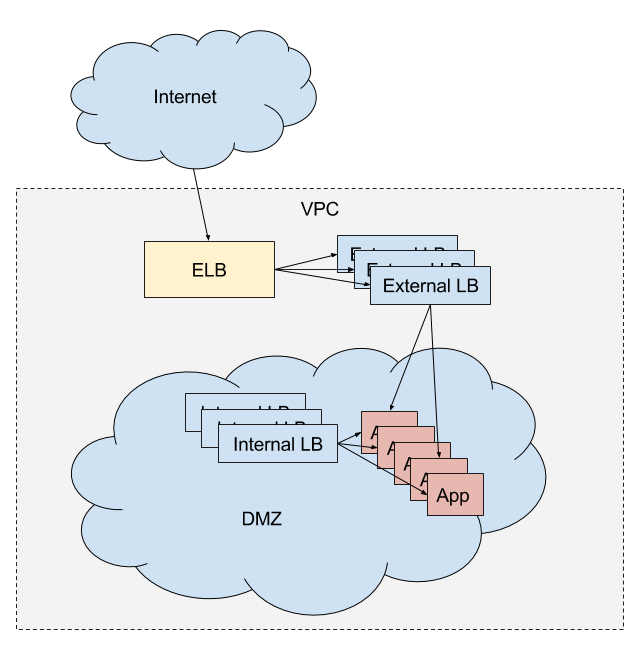
To demonstrate marathon-lb, we'll boot a DCOS cluster on AWS, and run an internal and external load balancer. The external load balancer will be used for routing external HTTP traffic into the cluster, and the internal LB will be used for internal service discovery and load balancing. Since we'll be doing this on AWS, external traffic will first hit an ELB configured to expose our "public" agent nodes.
If you'd like to follow along, you can create your own cluster on AWS. Mesosphere does not charge anything for using DCOS Community Edition on AWS, but you'll still have to pay for the underlying instances and associated AWS costs.
The marathon-lb tool is available as a package from our universe. To install marathon-lb:
$ dcos package install marathon-lb
To check that marathon-lb is working, find the IP for your public slave and navigate to http://<public slave ip>:9090/haproxy?stats. You'll see a statistics report page like this:
Next, we'll set up our internal LB. To do this, we must first specify some configuration options for the marathon-lb package. Create a file called options.json with the following contents:
{ "marathon-lb":{ "name":"marathon-lb-internal", "haproxy-group":"internal", "bind-http-https":false, "role":"" }}In this options file, we're changing a) the name of the app instance, b) the name of the HAProxy group, and b) we're disabling the HTTP and HTTPS forwarding on ports 80 and 443 (because it's unneeded).
Next, run the install command with our new options:
$ dcos package install --options=options.json marathon-lb
Now we'll have 2 load balancers: an external LB, and an internal LB. Let's launch a sample application to demonstrate the features. Here's our external instance of nginx:
{ "id": "nginx-external", "container": { "type": "DOCKER", "docker": { "image": "nginx:1.7.7", "network": "BRIDGE", "portMappings": [ { "hostPort": 0, "containerPort": 80, "servicePort": 10000 } ], "forcePullImage":true } }, "instances": 1, "cpus": 0.1, "mem": 65, "healthChecks": [{ "protocol": "HTTP", "path": "/", "portIndex": 0, "timeoutSeconds": 10, "gracePeriodSeconds": 10, "intervalSeconds": 2, "maxConsecutiveFailures": 10 }], "labels":{ "HAPROXY_GROUP":"external" }}You can launch this app on DCOS by pasting the JSON above into a file (called nginx-external.json), and running:
$ dcos marathon app add nginx-external.json
The application definition includes a special label with the key HAPROXY_GROUP. This label tells marathon-lb whether or not to expose the application. The external marathon-lb was started with the --group parameter set to external, which is the default. You can inspect the code here, if you'd like.
And here's our internal nginx:
{ "id": "nginx-internal", "container": { "type": "DOCKER", "docker": { "image": "nginx:1.7.7", "network": "BRIDGE", "portMappings": [ { "hostPort": 0, "containerPort": 80, "servicePort": 10001 } ], "forcePullImage":true } }, "instances": 1, "cpus": 0.1, "mem": 65, "healthChecks": [{ "protocol": "HTTP", "path": "/", "portIndex": 0, "timeoutSeconds": 10, "gracePeriodSeconds": 10, "intervalSeconds": 2, "maxConsecutiveFailures": 10 }], "labels":{ "HAPROXY_GROUP":"internal" }}Notice that we're specifying a servicePort parameter. The servicePort is the port that exposes this service on marathon-lb. By default, port 10000 through to 10100 are reserved for marathon-lb services, so you should begin numbering your service ports from 10000 (that's 101 service ports, if you're counting). You may want to use a spreadsheet to keep track of which ports have been allocated to which services for each set of LBs.
Let's add one more instance of nginx:
{ "id": "nginx-everywhere", "container": { "type": "DOCKER", "docker": { "image": "nginx:1.7.7", "network": "BRIDGE", "portMappings": [ { "hostPort": 0, "containerPort": 80, "servicePort": 10002 } ], "forcePullImage":true } }, "instances": 1, "cpus": 0.1, "mem": 65, "healthChecks": [{ "protocol": "HTTP", "path": "/", "portIndex": 0, "timeoutSeconds": 10, "gracePeriodSeconds": 10, "intervalSeconds": 2, "maxConsecutiveFailures": 10 }], "labels":{ "HAPROXY_GROUP":"external,internal" }}This instance of nginx is going to be exposed everywhere. Note that we've changed the servicePort so it does not overlap with the other nginx instances.
Service ports can be defined either by using port mappings (as in the examples above), or with the ports parameter in the Marathon app definition.
To test our configuration, SSH into one of the instances in the cluster (such as a master), and try curl-ing the endpoints:
$ curl http://marathon-lb.marathon.mesos:10000/
$ curl http://marathon-lb-internal.marathon.mesos:10001/
$ curl http://marathon-lb.marathon.mesos:10002/
$ curl http://marathon-lb-internal.marathon.mesos:10002/
Each of these should return the nginx ‘Welcome' page, like this:
Virtual hosts
An important feature of marathon-lb is support for virtual hosts. This allows you to route HTTP traffic for multiple hosts (FQDNs) and route requests to the correct endpoint. For example, you could have two distinct web properties, ilovesteak.com and steaknow.com, with DNS for both pointing to the same LB on the same port, and HAProxy will route traffic to the correct endpoint based on the domain name.
To test the vhost feature, navigate to the AWS console and look for your public ELB. We're going to make 2 changes to the public ELB in order to test it. First, we'll modify the health checks to use HAProxy's built in health check:
Change the health check to ping the hosts on port 9090, at the path /_haproxy_health_check. Now, if you navigate to the instances tab, you should see the instances listed as InService, like this:
Now our ELB is able to route traffic to HAProxy. Next, let's modify our nginx app to expose our service. To do this, you'll need to get the public DNS name for the ELB from the Description tab. In this example, my public DNS name is brenden-j-PublicSl-1LTLKZEH6B2G6-1145355943.us-west-2.elb.amazonaws.com.
I'll now modify the external nginx app to look like this:
{ "id": "nginx-external", "container": { "type": "DOCKER", "docker": { "image": "nginx:1.7.7", "network": "BRIDGE", "portMappings": [ { "hostPort": 0, "containerPort": 80, "servicePort": 10000 } ], "forcePullImage":true } }, "instances": 1, "cpus": 0.1, "mem": 65, "healthChecks": [{ "protocol": "HTTP", "path": "/", "portIndex": 0, "timeoutSeconds": 10, "gracePeriodSeconds": 10, "intervalSeconds": 2, "maxConsecutiveFailures": 10 }], "labels":{ "HAPROXY_GROUP":"external", "HAPROXY_0_VHOST":"brenden-j-PublicSl-1LTLKZEH6B2G6-1145355943.us-west-2.elb.amazonaws.com" }}We've added the label HAPROXY_0_VHOST, which tells marathon-lb to expose nginx on the external load balancer with a vhost. The 0 in the label key corresponds to the servicePort index, beginning from 0. If you had multiple servicePort definitions, you would iterate them as 0, 1, 2, and so on.
Now, if you navigate to the ELB public DNS address in your browser, you should see the following:
Ta-da!
Check out part 2 of this post, where we talk about more advanced marathon-lb features, and how you can use HAProxy to implement app autoscaling.