18 min read
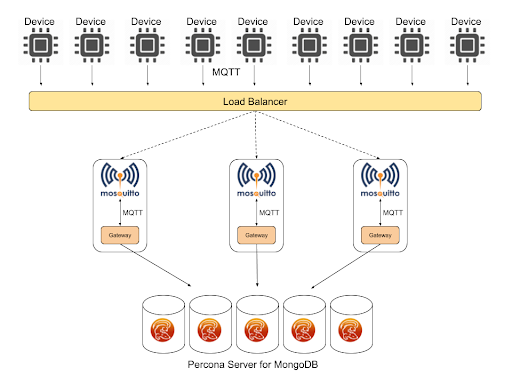
#!/usr/bin/env python"""MQTT generator"""import randomimport timeimport uuidimport jsonfrom argparse import ArgumentParserimport paho.mqtt.client as mqttparser = ArgumentParser()parser.add_argument("-b", "--broker", dest="broker_address",required=True, help="MQTT broker address")parser.add_argument("-p", "--port", dest="broker_port", default=1883, help="MQTT broker port")parser.add_argument("-r", "--rate", dest="sample_rate", default=5, help="Sample rate")parser.add_argument("-q", "--qos", dest="qos", default=0, help="MQTT QOS")args = parser.parse_args()uuid = str(uuid.uuid4())topic = "device/%s" % uuidmqttc = mqtt.Client(uuid, False)mqttc.connect(args.broker_address, args.broker_port)while True:rand = random.randint(20,30)msg = {'uuid': uuid,'value': rand}mqttc.publish(topic, payload=json.dumps(msg), qos=args.qos)time.sleep(float(args.sample_rate))mqttc.loop_forever()$ pip freeze > requirements.txt$ cat requirements.txtpaho-mqtt==1.3.1
$ cat DockerfileFROM python:2WORKDIR /usr/src/appCOPY requirements.txt ./RUN pip install --no-cache-dir -r requirements.txtCOPY device.py .CMD [ "/bin/bash" ]
$ docker build -t device .Sending build context to Docker daemon 12.78MBStep 1/6 : FROM python:22: Pulling from library/python0bd44ff9c2cf: Pull complete047670ddbd2a: Pull completeea7d5dc89438: Pull completeae7ad5906a75: Pull complete0f2ddfdfc7d1: Pull complete85124268af27: Pull complete1be236abd831: Pull completefe14cb9cb76d: Pull completecb05686b397d: Pull completeDigest: sha256:c45600ff303d92e999ec8bd036678676e32232054bc930398da092f876c5e356Status: Downloaded newer image for python:2---> 0fcc7acd124bStep 2/6 : WORKDIR /usr/src/appRemoving intermediate container ea5359354513---> a382209b69eaStep 3/6 : COPY requirements.txt ./---> b994369a0a58Step 4/6 : RUN pip install --no-cache-dir -r requirements.txt---> Running in 1e60a96f7e7aCollecting paho-mqtt==1.3.1 (from -r requirements.txt (line 1))Downloading https://files.pythonhosted.org/packages/2a/5f/cf14b8f9f8ed1891cda893a2a7d1d6fa23de2a9fb4832f05cef02b79d01f/paho-mqtt-1.3.1.tar.gz (80kB)Installing collected packages: paho-mqttRunning setup.py install for paho-mqtt: startedRunning setup.py install for paho-mqtt: finished with status 'done'Successfully installed paho-mqtt-1.3.1Removing intermediate container 1e60a96f7e7a---> 3340f783442bStep 5/6 : COPY device.py .---> 72a88b68e43cStep 6/6 : CMD [ "/bin/bash" ]---> Running in a128ffb330fcRemoving intermediate container a128ffb330fc---> dad1849c3966Successfully built dad1849c3966Successfully tagged device:latest $ docker imagesREPOSITORY TAG IMAGE ID CREATED SIZEdevice latest dad1849c3966 About an hour ago 903MBpython 2 0fcc7acd124b 9 days ago 902MB
$ docker login --username=mattjarvisPassword:Login Succeeded
$ docker tag dad1849c3966 mattjarvis/device:latest
$ docker push mattjarvis/deviceThe push refers to repository [docker.io/mattjarvis/device]d52256b6a396: Pushed6b19db956ca6: Pushedcd0c68b16296: Pushed812812e9c2f5: Pushed05331f1f8e6f: Layer already existsd8077e47eb94: Layer already exists5c0800b60a4e: Layer already existsebc569cb707f: Layer already exists9df2ff4714f2: Layer already existsc30dae2762bd: Layer already exists43701cc70351: Layer already existse14378b596fb: Layer already existsa2e66f6c6f5f: Layer already existslatest: digest: sha256:8a1407f64dd0eff63484f8560b605021fa952af00552fec6c8efb913d5bba076 size: 3053
$ cat mongogw.py#!/usr/bin/env python"""MQTT to MongoDB Gateway"""import jsonfrom argparse import ArgumentParserimport paho.mqtt.client as mqttimport pymongoimport datetimeimport osparser = ArgumentParser()parser.add_argument("-b", "--broker", dest="broker_address",required=True, help="MQTT broker address")parser.add_argument("-p", "--port", dest="broker_port", default=1883, help="MQTT broker port")parser.add_argument("-m", "--mongouri", dest="mongo_uri", required=True, help="MongoDB URI")parser.add_argument("-u", "--mongouser", dest="mongo_user", required=True, help="MongoDB user")parser.add_argument("-w", "--mongopwd", dest="mongo_password", required=True, help="MongoDB password")args = parser.parse_args()def on_message(client, userdata, message):json_data = json.loads(message.payload)post_data = {'date': datetime.datetime.utcnow(),'deviceUID': json_data['uuid'],'value': json_data['value'],'gatewayID': os.environ['MESOS_TASK_ID']}result = devices.insert_one(post_data)# MongoDB connectionmongo_client = pymongo.MongoClient(args.mongo_uri,username=args.mongo_user,password=args.mongo_password,authSource='mongogw',authMechanism='SCRAM-SHA-1')db = mongo_client.mongogwdevices = db.devices# MQTT connectionmqttc = mqtt.Client("mongogw", False)mqttc.on_message=on_messagemqttc.connect(args.broker_address, args.broker_port)mqttc.subscribe("device/#", qos=0)mqttc.loop_forever()$ cat DockerfileFROM python:2WORKDIR /usr/src/appCOPY requirements.txt ./RUN pip install --no-cache-dir -r requirements.txtCOPY mongogw.py .CMD [ "/bin/bash" ]
$ cat demo.json{ "mongodb-credentials": { "backupUser": "backup", "backupPassword": "backupuserpassword", "userAdminUser": "useradmin", "userAdminPassword": "useradminpassword", "clusterAdminUser": "clusteradmin", "clusterAdminPassword": "clusteradminpassword", "clusterMonitorUser": "clustermonitor", "clusterMonitorPassword": "monitoruserpassword", "key": "8cNNTVP6GqEOKzhUVDVryxIt04K6kDbXygamH4upPGAO59gzXVQAgX9NwxwqDvpt 094zMkkRWDLzuCgbg3Aj8EFVEM0/W1Nz+XUSTHEn4HiNzCVG4TTHFP6P1PEPswG6 tQMP6bnRXL7uGWmdGhbAxOV/+p6AfNs67MTvfCeH0EaPCgPPXhJft9D0nZ0SPOm9 VvfxG3djnHClIlclkchoIwc1Kw21loyXwuOjX4RkywVDdmFXjKC+l9yxfyt/9Gyh YE0OlS7ozWLiH8zy0MyzBdK+rc0fsxb2/Kb/8/2diC3O3gdVxjneQxaf66+FHVNW mV9/IHDptBHosdWkv0GboW8ZnTXnk0lyY0Jw85JFuTeFBzqPlB37jR0NU/HFm5QT Ld62woaGIWCTuXGb81QHaglPZUBIhEq/b3tahJBmLc+LKd0FUShoupTtPc2FjxbH xD8dZ+L9Uv7NPtSe+o3sTD60Pnsw1wbOrNDrrC+wpwoMy2GbQjXk/d+SRK/CXfuk Z676GKQDivpinhdF58l4OEi+WEN633yuNtNAQDgz+aOVZKN4oLoyR22B1nrea1qW wzZjRw7kpVxcQKiyn+gDmAZZPbctiVqTNHPE5n9LrOcctuLZKpoQk97lvZTSCKfy d32mfx9szZZ/QCfF9Dt7+G5nJUAULigKnQYRi/i86ZTPHSzfun+ZIzYLCzJuZfyS 7E8DMsmv9wCPrPAF/8cOFMWW0o0Na7GZKCJ8U+AMm92R725h4g5ao6+kQPG7vOkY LR8MJzDOqcmAC0M9AwE5UXQl56V6qBNyREx/WGGYS1B5DOfZvVTJNDkoHVIL1upZ geSlACiXQ+M0Rkgo0h8BJUhGY9LTuc6S8qiMBEnhBClg4kA/u4FJ06nlmF3ZpIXT KsVSr9ee3mu0vSr6P52slvAAX+RL3y+JgSlz2kC8oVgCZZdKn7yq9e6yB3zHNMjX 8VIi/UgFmfqCiaAlUT0pt2ZzGuw1L9QUOuNAZfufSkK1ED4V" }}$ openssl rand -base64 756
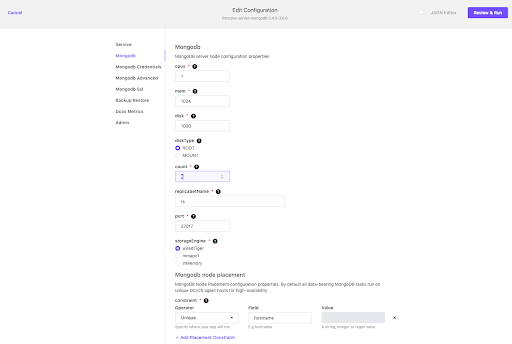
$ dcos package install percona-server-mongodb --options=demo.jsonBy Deploying, you agree to the Terms and Conditions https://d2iq.com/catalog-terms-conditions/#community-servicesDefault configuration requires 3 agent nodes each with: 1.0 CPU | 1024 MB MEM | 1 1000 MB DiskContinue installing? [yes/no] yesInstalling Marathon app for package [percona-server-mongodb] version [0.4.0-3.6.6]Installing CLI subcommand for package [percona-server-mongodb] version [0.4.0-3.6.6]New command available: dcos percona-server-mongodbThe DC/OS Percona Server for MongoDB service is being installed.Documentation: https://docs.mesosphere.com/service-docs/percona-server-mongodb/Issues: https://jira.percona.com/secure/CreateIssue!default.jspa?pid=12402.
$ cat mongouser.json{ "user": "mongogw", "pwd": "123456", "roles": [ { "db": "mongogw", "role": "readWrite" } ]}$ dcos percona-server-mongodb user add mongogw mongouser.json{ "message": "Received cmd: start update-user with parameters: {MONGODB_CHANGE_USER_DB=mongogw, MONGODB_CHANGE_USER_DATA=eyJ1c2VycyI6W3sidXNlciI6Im1vbmdvZ3ciLCJwd2QiOiIxMjM0NTYiLCJyb2xlcyI6W3sicm9sZSI6InJlYWRXcml0ZSIsImRiIjoibW9uZ29ndyJ9XX1dfQ==}"}{ "id": "/mqtt", "containers": [ { "name": "mosquitto", "resources": { "cpus": 0.1, "mem": 64 }, "image": { "id": "eclipse-mosquitto", "kind": "DOCKER" }, "endpoints": [ { "name": "mqtt", "containerPort": 1883, "hostPort": 1883, "protocol": [ "tcp" ], "labels": { "VIP_0": "/mqtt:1883" } } ] }, { "name": "mongogw", "resources": { "cpus": 0.1, "mem": 64 }, "image": { "id": "mattjarvis/mongogw", "kind": "DOCKER" }, "exec": { "command": { "shell": "./mongogw.py -b localhost -m mongo-rs-0-mongod.percona-server-mongodb.autoip.dcos.thisdcos.directory,mongo-rs-1-mongod.percona-server-mongodb.autoip.dcos.thisdcos.directory,mongo-rs-2-mongod.percona-server-mongodb.autoip.dcos.thisdcos.directory:27017 -u mongogw -n 123456" } } } ], "scaling": { "instances": 1, "kind": "fixed" }, "networks": [ { "name": "dcos", "mode": "container" } ], "volumes": [], "fetch": [], "scheduling": { "placement": { "constraints": [] } }}$ dcos marathon pod add mqttpod.jsonCreated deployment 19887892-f3e9-44b4-9dd3-22a5790196f3
{ "id": "device", "instances": 1, "cpus": 0.1, "mem": 16, "cmd": "./device.py -b mqtt.marathon.l4lb.thisdcos.directory -r 2", "container": { "type": "MESOS", "docker": { "image": "mattjarvis/device", "forcePullImage": true, "privileged": false } }, "requirePorts": false}$ dcos marathon app add device.jsonCreated deployment 231be2c7-47c6-4f28-a7e0-40f4aae2f743
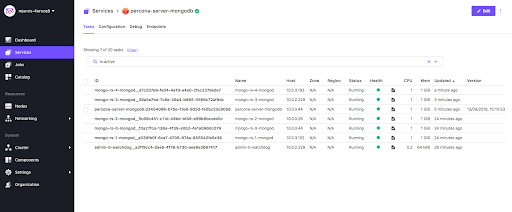
$ dcos taskNAME HOST USER STATE ID MESOS ID REGION ZONEadmin-0-watchdog 10.0.2.229 root R admin-0-watchdog__a3ff9cc4-daeb-4f76-b730-aea8e2667417 3ba115f5-b4fe-43e9-a05a-0d9b0240fb51-S4 --- ---device 10.0.3.192 root S device.769ef300-b75d-11e8-9d5d-fe0bc23c90b8 3ba115f5-b4fe-43e9-a05a-0d9b0240fb51-S3 --- ---mongo-rs-0-mongod 10.0.0.44 root R mongo-rs-0-mongod__f0a27fca-138a-4f39-a0b2-4a1a0960c079 3ba115f5-b4fe-43e9-a05a-0d9b0240fb51-S6 --- ---mongo-rs-1-mongod 10.0.3.152 root R mongo-rs-1-mongod__a039fb0f-6ca7-4706-974a-855542fa5e36 3ba115f5-b4fe-43e9-a05a-0d9b0240fb51-S2 --- ---mongo-rs-2-mongod 10.0.0.26 root R mongo-rs-2-mongod__5c68c451-c11d-49bd-bf49-e99b8bcceb5c 3ba115f5-b4fe-43e9-a05a-0d9b0240fb51-S1 --- ---mongogw 10.0.0.44 root R mqtt.instance-565e6b1f-b75d-11e8-9d5d-fe0bc23c90b8.mongogw 3ba115f5-b4fe-43e9-a05a-0d9b0240fb51-S6 --- ---mosquitto 10.0.0.44 root R mqtt.instance-565e6b1f-b75d-11e8-9d5d-fe0bc23c90b8.mosquitto 3ba115f5-b4fe-43e9-a05a-0d9b0240fb51-S6 --- ---percona-server-mongodb 10.0.0.26 root R percona-server-mongodb.cfbfcaae-b75b-11e8-9d5d-fe0bc23c90b8 3ba115f5-b4fe-43e9-a05a-0d9b0240fb51-S1 --- ---
$ dcos task exec --tty --interactive mongo-rs-0-mongod__f0a27fca-138a-4f39-a0b2-4a1a0960c079 /bin/bashroot@ip-10-0-0-44:/mnt/mesos/sandbox#
root@ip-10-0-0-44:/mnt/mesos/sandbox# mongo mongodb://mongogw:123456@mongo-rs-0-mongod.percona-server-mongodb.autoip.dcos.thisdcos.directory,mongo-rs-1-mongod.percona-server-mongodb.autoip.dcos.thisdcos.directory,mongo-rs-2-mongod.percona-server-mongodb.autoip.dcos.thisdcos.directory:27017/mongogw?replicaSet=rs
rs:PRIMARY> use mongogw;switched to db mongogw
rs:PRIMARY> db.devices.count();117
rs:PRIMARY> db.devices.findOne();{ "_id" : ObjectId("5b9a6db71284f4000452fd31"), "date" : ISODate("2018-09-13T14:01:27.529Z"), "deviceUID" : "f5265ed9-a162-4c72-926d-f537b0ef356c", "value" : 22, "gatewayID" : "mqtt.instance-565e6b1f-b75d-11e8-9d5d-fe0bc23c90b8.mongogw"}$ cat device.json{ "id": "device", "instances": 3, "cpus": 0.1, "mem": 16, "cmd": "./device.py -b mqtt.marathon.l4lb.thisdcos.directory -r 2", "container": { "type": "MESOS", "docker": { "image": "mattjarvis/device", "forcePullImage": true, "privileged": false } }, "requirePorts": false}$ dcos marathon app update device < device.json Created deployment 83c91f20-9944-4933-943b-90cee2711640
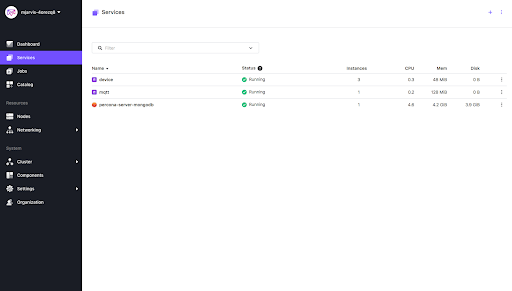
rs:PRIMARY> db.devices.find().limit(5).sort({$natural:-1}){ "_id" : ObjectId("5b9a6ef01284f4000452fdef"), "date" : ISODate("2018-09-13T14:06:40.698Z"), "deviceUID" : "919473a4-b332-4929-9b5e-c0a80f498222", "value" : 24, "gatewayID" : "mqtt.instance-565e6b1f-b75d-11e8-9d5d-fe0bc23c90b8.mongogw" }{ "_id" : ObjectId("5b9a6ef01284f4000452fdee"), "date" : ISODate("2018-09-13T14:06:40.165Z"), "deviceUID" : "9474a1ee-c1c7-4f1d-a012-c6e4c883c7d3", "value" : 27, "gatewayID" : "mqtt.instance-565e6b1f-b75d-11e8-9d5d-fe0bc23c90b8.mongogw" }{ "_id" : ObjectId("5b9a6eef1284f4000452fded"), "date" : ISODate("2018-09-13T14:06:39.882Z"), "deviceUID" : "f5265ed9-a162-4c72-926d-f537b0ef356c", "value" : 29, "gatewayID" : "mqtt.instance-565e6b1f-b75d-11e8-9d5d-fe0bc23c90b8.mongogw" }{ "_id" : ObjectId("5b9a6eee1284f4000452fdec"), "date" : ISODate("2018-09-13T14:06:38.696Z"), "deviceUID" : "919473a4-b332-4929-9b5e-c0a80f498222", "value" : 25, "gatewayID" : "mqtt.instance-565e6b1f-b75d-11e8-9d5d-fe0bc23c90b8.mongogw" }{ "_id" : ObjectId("5b9a6eee1284f4000452fdeb"), "date" : ISODate("2018-09-13T14:06:38.163Z"), "deviceUID" : "9474a1ee-c1c7-4f1d-a012-c6e4c883c7d3", "value" : 25, "gatewayID" : "mqtt.instance-565e6b1f-b75d-11e8-9d5d-fe0bc23c90b8.mongogw" }$ dcos marathon pod update mqtt < mqttpod.json Created deployment 1fdc863b-9815-417e-87ac-858b56f8630f
rs:PRIMARY> db.devices.find().limit(5).sort({$natural:-1}){ "_id" : ObjectId("5b9a6f981284f4000452fef9"), "date" : ISODate("2018-09-13T14:09:28.076Z"), "deviceUID" : "f5265ed9-a162-4c72-926d-f537b0ef356c", "value" : 26, "gatewayID" : "mqtt.instance-565e6b1f-b75d-11e8-9d5d-fe0bc23c90b8.mongogw" }{ "_id" : ObjectId("5b9a6f971284f4000452fef8"), "date" : ISODate("2018-09-13T14:09:27.158Z"), "deviceUID" : "43e2785e-90b2-4cac-9e68-c3b72984f83c", "value" : 27, "gatewayID" : "mqtt.instance-565e6b1f-b75d-11e8-9d5d-fe0bc23c90b8.mongogw" }{ "_id" : ObjectId("5b9a6f964931e30004900d25"), "date" : ISODate("2018-09-13T14:09:26.942Z"), "deviceUID" : "6b9d763b-699e-47eb-8541-704931dbb6e9", "value" : 26, "gatewayID" : "mqtt.instance-6f0de323-b75e-11e8-9d5d-fe0bc23c90b8.mongogw" }{ "_id" : ObjectId("5b9a6f961284f4000452fef7"), "date" : ISODate("2018-09-13T14:09:26.882Z"), "deviceUID" : "919473a4-b332-4929-9b5e-c0a80f498222", "value" : 30, "gatewayID" : "mqtt.instance-565e6b1f-b75d-11e8-9d5d-fe0bc23c90b8.mongogw" }{ "_id" : ObjectId("5b9a6f961284f4000452fef6"), "date" : ISODate("2018-09-13T14:09:26.363Z"), "deviceUID" : "9474a1ee-c1c7-4f1d-a012-c6e4c883c7d3", "value" : 26, "gatewayID" : "mqtt.instance-565e6b1f-b75d-11e8-9d5d-fe0bc23c90b8.mongogw" }