

Apr 20, 2016
D2iQ
D2iQ
7 min read
Here at Mesosphere, we love Mesos. Obviously. It's a proven technology that's being used successfully at hundreds of companies to run containers in production. But as is usually the case with "scalable" technologies, Mesos isn't the easiest system to deploy.
Suppose you want to use Mesos to host your new microservices architecture. In the old Mesos world, you would set up Mesos and Marathon (no trivial tasks) and think you were ready to start deploying your services. Until you discovered that you still needed to figure out how you were going do service discovery, load balancing, monitoring—the list goes on.
This is the problem Mesosphere set out to solve with our datacenter operating system technology, which we open sourced under the DC/OS moniker earlier this week. We curated a complete set of technologies to simplify the deployment of a Mesos cluster: installation, monitoring, service discovery, DNS management, load balancing, and even a package-management system to make it easy to deploy Mesos-enabled applications. DC/OS is ready to run anywhere from laptops to huge cloud computing platforms, and in addition to its Mesos core includes the following major components:
- An easy installer: List the IP addresses of your nodes and a couple configuration options in our config.yaml file, and DC/OS will automatically bootstrap, install and validate a complete Mesos installation, with all the DC/OS components.
- Cluster-wide DNS: DC/OS makes all your frameworks, apps, services, and containers discoverable and addressable by DNS, so that you can spend less time figuring out service discovery and more time building great software.
- A container-orchestration platform: DC/OS uses Marathon to launch, monitor and heal your applications, so that a few (dozen) machine failures don't even cause a blip in your uptime.
- The DC/OS package universe: Ever wanted a 1-click installation to deploy and scale Cassandra, Kafka, Spark or HAproxy edge routing? All these are available and fully open source through the DC/OS packaging system.
In this blog, we're going to walk through the process installing DC/OS and launching a simple Docker application, called Ghost. It will have a highly available, fault-tolerant configuration, so that we can lose several machines unexpectedly without any service interruption. And we're going to have 1-click scaling of our application for when we need to scale up to more machines. And we're going to have everything load-balanced and fronted by HAProxy, so we'll be able to handle whatever load our clients put on our system.
Let's get started! (But before we do, note that DC/OS isn't done yet—there's a lot we'd still like to add, and inevitably there will be bugs. So if you're trying to figure out how to do something with DC/OS and it doesn't seem to be working, don't fret: email our community at help@dcos.io or visit our Community page. Also, see our Contribution page for information on how to contribute.)
Choosing an installer
DC/OS has three installation modes—GUI, CLI and Advanced—and we're going to use the CLI for this example. GUI mode is really awesome—one day, this is how most installations will be done—but we are going to use some configuration options that the GUI doesn't yet provide. Advanced mode isn't that much more advanced, but it does require you to run commands on your agents, rather than the installer automatically SSHing all over your cluster.
What machines do I need?
For this example, we're going to use CentOS 7 images on Amazon Web Services. One of the challenges a lot of people encounter with Mesos is setting up their machines for Mesos because you need to install Docker, configure cgroups, get your systemd units just right, set up SELinux and more. The DC/OS installer automatically configures all these packages and settings for your nodes, so you can spend less time provisioning and more time using.
We're going to run DC/OS with three masters (for high availability) and three agents (which we could easily scale up). One of those agents will be exposed to the public internet; it's going to provide HAProxy load balancing and edge routing. Even though we're only setting up one load balancer agent, you'll see how easy it would be to add a half dozen or more when you need to scale.
Finally, we're going to need one extra machine to be our bootstrap node. From this node, we'll launch the installer and manage changes and upgrades to our DC/OS Mesos cluster.
Our example is going to be built for the AWS VPC. If you're still using AWS EC2 classic, just follow this link to learn how to enable a VPC on your account. It's easy to add without losing any AWS functionality. If you'd like to look at how I configured my VPC, here's a screenshot of the page before I launched it.
What if I don't use AWS?
DC/OS comes with AWS CloudFormation and Microsoft Azure Resource Manager templates, which fully automate the provisioning and maintenance of a DC/OS cluster on AWS or Azure. But we're not going to use that. We're going to roll up our sleeves and get our hands dirty, because the exact same approach will work equally well on bare metal, a private datacenter or your favorite cloud provider.
What if I don't use CentOS 7?
Don't worry, neither do I! One week ago, I had never touched an RPM-based Linux distro—I have been using Debian derivatives from Day 1. I'll make sure to point out any differences between distributions, but since DC/OS and containers abstract away so much of the nitty-gritty details of your OS, there's only a few things you should know:
- Instead of apt-get, you use yum.
I bet you didn't think it'd be that easy. DC/OS also supports a variety of other Linux distros (including RHEL, CoreOS and Ubuntu) depending on the the platform.
However, if you're still using CentOS or RHEL 6, or a version of Ubuntu prior to Xenial, you'll need to use a more recent version. DC/OS needs some of the latest and greatest systemd and Linux containers features to deliver on its promise of easy, reliable, scalable containers.
Provisioning our machines
First things first, let's get some virtual machines. But which CentOS should we pick? There's 162 to choose from!
I decided to use one of the officially supported CentOS 7 images. You can find it by searching for the AMI ami-6d1c2007 in the community images section.
I'd recommend using the m3.xlarge machines (or even a more powerful machine) for DC/OS. When you use a machine with only a couple CPUs or a few gigabytes of RAM, Mesos will have a harder time placing all the containers, because there's so little room to adjust the placement of containers (especially if you want to do zero-downtime rolling updates).
Next, we'll go to the Configure Instance tab. The only change we'll make here is to launch seven instances instead of one. If you have used EC2 classic in the past, you may also need to change the Network to your VPC. You can ignore the warning about autoscaling groups for now. However, before you starting hosting production services on DC/OS, you'll want to enable autoscaling groups (or your platform's equivalent) to make sure you get pain-free recovery from machine failures.
At this point, we need to set up the security group. We'll make a new security group and, for now, just enable All TCP from the my IP source. I recommending naming this security group something easy to remember, like "First DC/OS Cluster". In a moment, to makes things easy, we're going to let all these nodes freely connect with one another.
Now, you can go to the last step: scroll to the bottom and click to launch our soon-to-be DC/OS cluster!
Enabling intra-security-group connectivity
Before we continue, let's just make sure that all our nodes can communicate with each other. Start by clicking on the cube in the the upper left menu. Let's go to EC2, under compute.
Next, choose the Security Groups option.
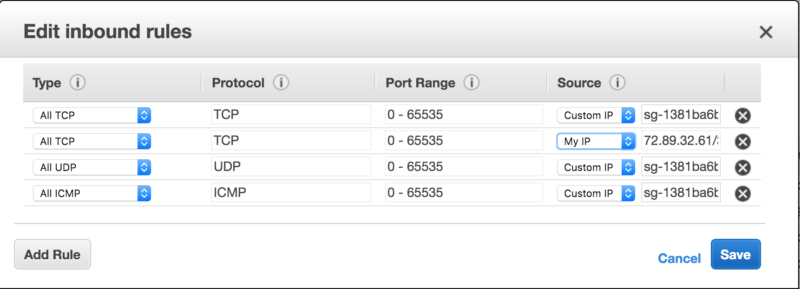
Now we can add a few more rules to our "First DC/OS Cluster" security group. To do this, click on our security group, then the Inbound Rules tab and then click the Edit button.
Now you can add three more rules: to allow all TCP, UDP and ICMP from the "First DC/OS Cluster" security group. As you can see in the image below, the AWS console shows us the ID of the security group rather than the name we gave it. Luckily, it still will autocomplete that field if we type its human name ("First DC/OS Cluster").
Up next: Time to install
With the machines provisioned and network connectivity ready, it's time to run the installer. Learn how to do that here, in Part 2 of this series.