

Nov 30, 2017
Joerg Schad
D2iQ

8 min read
D2iQ has chosen to sunset DC/OS, with an end-of-life date of October 31, 2021. With D2iQ Kubernetes Platform (DKP), our customers get the same benefits provided by DC/OS and more, as well as access to the most impressive pace of innovation the technology world has ever seen.
Learn more about D2iQ Kubernetes Platform here.
TensorFlow is a popular open source software library that makes it easier for data science teams to design, build and train deep learning models. The DC/OS TensorFlow package enables you to setup a distributed, fault tolerant TensorFlow cluster with a single click.
There's more to TensorFlow than simply installing it, and this post explains how to train your custom model using the DC/OS TensorFlow package. Please note, that we describe the workflow with the current beta version of the package, and the workflow will change in future releases.
First, we explain how to to build your model for distributed deployment (i.e., your actual TensorFlow code written in python). We then look at writing an options.json file to help orchestrate your TensorFlow deployment (i.e., the actual specification used by the DC/OS TensorFlow package to deploy your model). Finally, we discuss some more advanced features available when using the DC/OS TensorFlow package.
There are no explicit prerequisites, but if you are completely new to the DC/OS TensorFlow package, we recommend you look at this example tutorial first.
Prepare the Model File
We start with the model file for the "Hello World" of distributed TensorFlow below:
import tensorflow as tf
c = tf.constant("Hello, distributed TensorFlow!")server = tf.train.Server.create_local_server()
sess = tf.Session(server.target) # Create a session on the server.
res = sess.run(c)
print(res)
Unlike when following the distributed TensorFlow tutorial linked above, which requires a manual ClusterSpec to be defined when distributed across multiple machines, the DC/OS TensorFlow package automates this step for you. The entry point into the model is provided by a hook with the signature:
def main(server, log_dir, context):
Here, server is a tf.train.Server object which has access to information about every other member of the TensorFlow cluster being deployed, log_dir is a string providing the recommended location for training logs, summaries, and checkpoints, and context is an optional dictionary of parameters that can be used to specify model settings such as batch size, and learning rate at run-time.
After adapting the original model description by using the server initialized by the DC/OS TensorFlow framework, we end up with the following model.
""" hello_world.py
"""
import tensorflow as tf
def main(server, log_dir, context):
"""
server: a tf.train.Server object (which knows about every other member of the cluster)
log_dir: a string providing the recommended location for training logs, summaries, and checkpoints
context: an optional dictionary of parameters (batch_size, learning_rate, etc.) specified at run-time
"""
c = tf.constant("Hello, distributed TensorFlow!")sess = tf.Session(server.target) # Create a session on the server.
res = sess.run(c)
print(res)
A model such as this can be tested locally by using the run_local.py script which can be obtained by cloning the dcos-tensorflow-tools repository. Note that this does require that TensorFlow is installed:
$ python run_local.py
2017-11-26 17:00:06.076234: I tensorflow/core/distributed_runtime/rpc/grpc_channel.cc:215] Initialize GrpcChannelCache for job local -> {0 -> localhost:51224}2017-11-26 17:00:06.076526: I tensorflow/core/distributed_runtime/rpc/grpc_server_lib.cc:324] Started server with target: grpc://localhost:51224
2017-11-26 17:00:06.080764: I tensorflow/core/distributed_runtime/master_session.cc:1004] Start master session e3b62dd340db772c with config:
b'Hello, distributed TensorFlow!'
[2017-11-26 17:00:06,108|__main__|INFO]: Done
In order to make this file available to our DC/OS TensorFlow cluster, we create an archive of the hello folder and upload it to a location from where it available to the cluster. For example: https://downloads.mesosphere.com/tensorflow-dcos/examples/hello.zip.
Prepare the Options File
With the current deployment model for the beta version of DC/OS TensorFlow package, the model you want to run is specified as options during the package installation (as mentioned earlier, this behavior will change in future releases). The easiest way of specifying these options is by installing the package using the DC/OS CLI:
$ dcos package install beta-tensorflow --options=OPTIONS.json
We provide a script (available in the dcos-tensorflow-tools repository) which helps you generate a template for such option files.
$ scripts/new-config.sh helloworld
This command will generate the following template in examples/local/helloworld.json:
{ "service": {"name": "helloworld",
"job_url": "{{JOB_URL}}","job_path": "",
"job_name": "{{JOB_NAME}}","job_context": "",
"shared_filesystem": "",
"use_tensorboard": false,
"user": "root"
},
"gpu_worker": {"count": 0,
"gpus": 1,
"cpus": 1,
"mem": 4096,
"disk": 4096,
"disk_type": "ROOT"
},
"worker": {"count": 1,
"port": 2222,
"cpus": 1,
"mem": 4096,
"disk": 4096,
"disk_type": "ROOT"
},
"parameter_server": {"count": 1,
"port": 2223,
"cpus": 1,
"mem": 4096,
"disk": 4096,
"disk_type": "ROOT"
},
"tensorboard": {"port": 6006,
"cpus": 1,
"mem": 4096
}
}
All that is left for us to specify are the following variables:
- "job_url": This is the URI from where the previously created archive can be downloaded, in our case: job_url: https://downloads.mesosphere.com/tensorflow-dcos/examples/hello.zip
- "job_path": This is the folder within the the archive, in our case: job_path: hello
- "job_name": This is the name for the python file, in our case job_name: hello_world
The final options file can also be found here.
$ dcos package install beta-tensorflow --options=./helloworld.json
To check whether the model training has completed, you can check whether the worker has finished from the DC/OS UI.
[caption id="attachment_10869" align="alignnone" width="1200"]
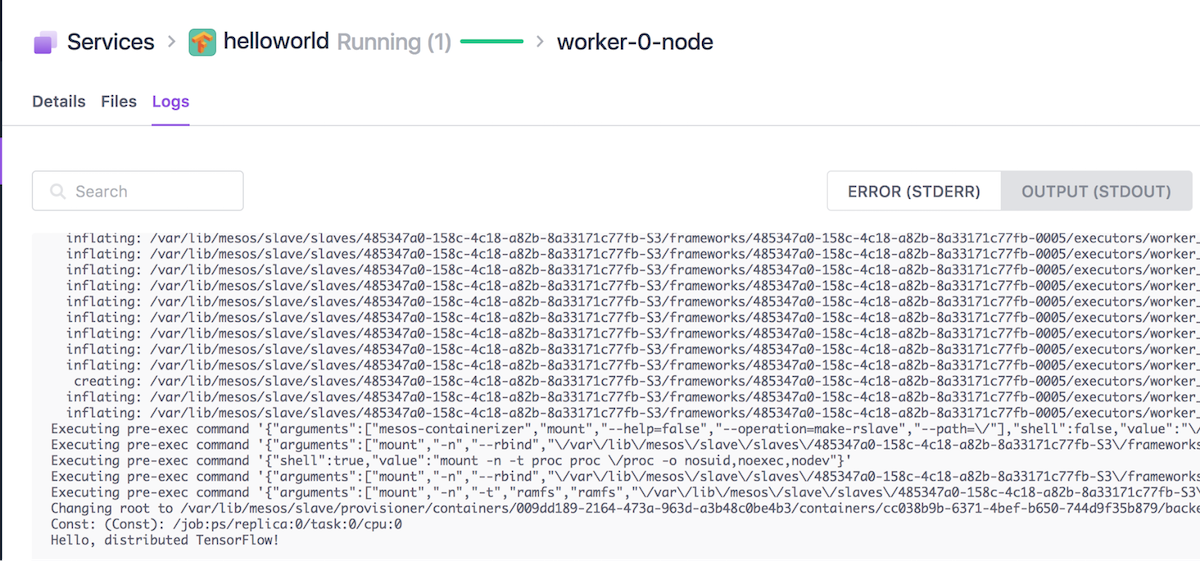
Figure 1: Finished worker task (and logs).[/caption]
Furthermore, you can also check the worker STDOUT logs from the UI, where you should see the Hello, distributed TensorFlow! message. You can also check the log from the CLI:
$ dcos task log worker-0-node
[caption id="attachment_10870" align="alignnone" width="1200"]
Picture 2: Worker STDOUT[/caption]
Congratulations, you have just trained your first custom TensorFlow model!
Note the scheduler may still remain running. It can be removed by running:
$ dcos package uninstall beta-tensorflow --app-id=helloworld
Utilizing Context and Logging
To understand how to utilize context and logging, let us look at the mnist example.
from tensorflow.examples.tutorials.mnist import input_data
def main(server, log_dir, context):
# Parse context
learning_rate = context.get('learning_rate') or 0.5 num_training_steps = context.get('num_training_steps') or 1000000# Import data
data_dir = log_dir + '/data'
mnist = input_data.read_data_sets(data_dir, one_hot=True)
...
The context enables any runtime settings to be made available in the main function as in this example the 'learning_rate' and 'num_training_steps'. Hence, there is no need to hardcode such settings into the model (and hence no need to create/upload new models when these values change). In the mnist.json options file we set these settings as follows:
"job_context": "{\"learning_rate\":0.5,\"num_training_steps\":1000000}",Furthermore, the example uses the log_dir as storage target when importing the input data.
If you want to learn more about the other options, please check the service guide.
Learn More About Distributed TensorFlow on DC/OS
To learn more about deploying TensorFlow models on DC/OS please watch Running Distributed TensorFlow on DC/OS from MesosCon Europe and checkout the example tutorial.
If you have questions about distributed TensorFlow on DC/OS, please reach out via the tensorflow-dcos Google group or the #tensorflow Slack channel.
The Secrets to Optimizing Apache Spark
The definitive hands-on guide for tuning and optimizing Apache Spark for better speed, scale, and utilization, O'Reilly's "High Performance Spark," shows how to use Apache Spark to process data quickly, at scale.